:: View topic - Photos of our workshops
Posts: 46 · 46 posts
unknownFri Mar 16, 2007 1:10 pm
It seems that, when looking at photos of builder's most recent ski creations, I often catch myself looking past the actual image of the new ski, into the space of the shop where the ski was born. I love workshops and I love tools. People go on house tours and on garden tours, but I've never heard of a 'workshop tour'... so, I'm starting one here. I was looking at www.happymonkeysnowboards.com earlier today, and was struck by how tidy Mike's shop was. It seems that my shop always looks like 100 elves worked the night shift, and when the sun came up, they immediately stopped what they were doing and walked out the door.
A dear friend of mine passed away about 15 years ago at 85 years old. He was an amazing guy... early days Indy 500 car designer, mechanic and racer. He was a certified steam engine engineer. He watched Lassen Peak erupt back in 1915 while riding with his dad in the car pictured below. Anyway, the shop that I now use was his when he was alive. Although, he was about 45 years older than I, we loved spending time together, especially in the shop. We built tons of things, including a VW that was steam powered and one that ran off of wood smoke. They're still sitting out back of the shop. My friend was a very active guy and died quite suddenly. After his death, his shop sat idle, just as he had left it on the last day he worked there, until about a year and a half ago when his wife heard that I was thinking about building skis. She said, "Bert would be so happy to know that you were doing something creative in his shop". So, here it is in all of it's glory. Sometimes when I run up against some problem in the shop that I just can't seem to find an answer for, I almost swear I here Berts voice saying, "Think boy, think"...like he so often did... and the answer then almost always comes. I hadn't planned on doing this post, so these photos are from awhile back.
C'mon... let's see some shop pics!
image no longer available
image no longer available
image no longer available
image no longer available
unknownFri Mar 16, 2007 5:24 pm
G-man: wow!!!! i like your shop. thanks for sharing. i'll post more photos of my "man-room" next week.
btw, the Kaweah is damp and it carves. but the tail is waaay too soft. i'll write more later. meeting powdercow and a few others at Snowbird tomorrow. spring skiing!!!
unknownMon Apr 23, 2007 3:05 am
i'm surprised that noone else has added to this thread -- don't you want to show off your skibuilding havens?
i'm just about finished 'cleaning up' my skibuilding room, so when it's nearly complete i'll give you a peek.
but for now, i have a couple (older) photos. when Kelvin and i work on skis we first jump into our flame-retardant red suits. why flame retardant? b/c we have a tendency of setting each other ablaze when working with tools.
actually, there's no reason other than we got the suits for a good deal from the Helly Hansen outlet. so, what do you wear (in addition to safety glasses, a respirator, and proper ear protection) when working on skis?
Kelvin flexing a core in his red suit. notice the knot in the core. yes, the core is just one continuous piece of wood -- no lamination here.
me with the bangers in my red suit.
unknownMon Apr 23, 2007 10:52 am
Man, how sweet to have all of that space. Must get get a bit chilly in the winter.
Is that a bottle of ROOT BEER on the band saw table?
G-man
unknownMon Apr 23, 2007 9:36 pm
haha we cant even buy root beer or dr. pepper here in aus lol i want some tho:P
unknownSat May 19, 2007 4:51 pm
there are two kinds of people in the world: those who park their cars in the garage and those who build skis.
finally finished the details of my space and cleaned it up. here's where i relax:
unknownSat May 19, 2007 9:43 pm
very nice gentlemen, wish i had that much space. real sweet tools also.
BK that must be the grizzly cabnet saw you mentioned before, they seem to make a nice tool for the money, i bought a 14" ultimate bandsaw with an extension block kit, i am very impressed with it so far.
i would snap some pictures of my shop but i lost it under a pile of beer cans while building my last two boards and it may take me a while to find it. right now i'm about to start a deep cleaning and reorganization, seems
i don't like to put my tools after i am done with them
it basically consists of a single car garage and a workshop in my basement. not near enough room but with with a little bit of moving stuff around it works.
when i'm done cleaning i'll post some photos. once again nice shops.
jason
unknownSun May 20, 2007 7:34 am
Great space bigKam... nice shiny floors... even looks like you have a sink. Nice bike, too. Skis and bikes... we're so lucky to have lives that allow us to enjoy such great toys.
G-man
unknownThu Jul 19, 2007 1:29 pm
I'm jealous, I got very little space in my Workshop.
image no longer available
image no longer available
image no longer available
image no longer available
I'm sorry for the low quality photos, but the light makes taking a picture difficult and it was just the cam from a mobile phone.
unknownMon Sep 17, 2007 3:52 pm
I am jealous of the workshops you guys have. Someday I may be able to get to that level. But I am very pleased being able to have a garage to call my own. I now have my cave.
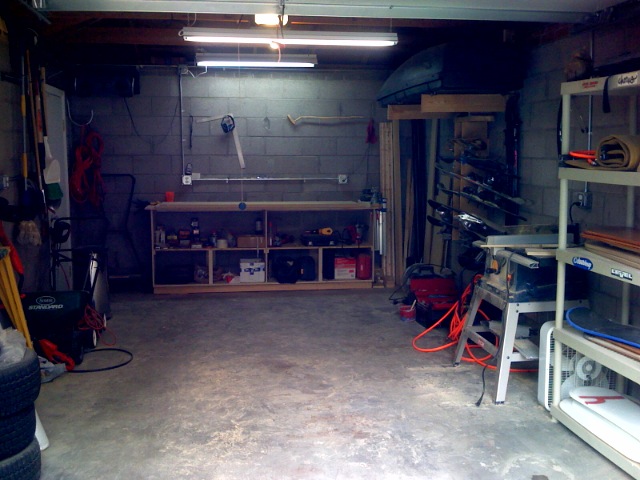
With the smaller space and still wanting to park my car in the garage, I need to figure good ways to organize and store stuff. After I get my press built I think I will suspend it from the ceiling with straps and pullies.
unknownMon Sep 17, 2007 10:52 pm
I had come to a point wehere I realised that to be in a place you thrive, doing what you love, is the most important factor of being happy. So two weeks ago, after 6 years in Oslo, I baught a farm in the mountains:
image no longer available
the factory:
image no longer available
inside:
image no longer available
taking over the 22nd. of October, this is going to be a great winter.
unknownTue Sep 18, 2007 7:11 am
where is the farm located??
unknownTue Sep 18, 2007 7:39 am
beautiful location you got, endre! and lots of space to keep some troll slave factory workers
but i don`t think i would lock myself into those buildings for skibuilding - i`d sit all the day long in front of the houses and admire the landscape
unknownTue Sep 18, 2007 7:47 am
yes that is actualy a real concern plywood, if we are not out skiing ..(yesterday they had some cm of freshies up there)
unknownTue Sep 18, 2007 12:22 pm
Lnset ved Oppdal
unknown
it looks also pretty outlying. an ideal refuge for some undisturbed top secret skidevelopments! i could definately live there too
the pics just strenghten my wish to travel to norway
unknownTue Sep 18, 2007 12:41 pm
Give me a call when you get here, the house has 16 beds.
unknownThu Oct 15, 2009 12:24 am
Bump- This has the potential to be a really cool thread. Doesn't anyone want to show off their work space??? Come on!
unknownThu Oct 15, 2009 7:32 am
Maybe we can revive the thread. Here's some pics of what my shop looks like after I've been working in it for awhile. I also do wood working so the shop gets a lot of use as you can see. Yes it needs a good cleaning now that I'm going to building skis. The room is the basement of an addition we put on the house about 10 years ago. It's roughly 16 x 24.
Here's what it looks like as you enter the room. The pics show the room as you look left to right.
image no longer available
image no longer available
image no longer available
image no longer available
As you can see there's not much room to layup skis at the moment. Buried behind the table saw is a new table on castors that I build for ski layup but currently has lumber stacked on it.
image no longer available
Behind the barrel of wood scraps are 2 large jewlery boxes in progress. They are just about done. Need to be urethaned and final assembly. I need to get them out there.
image no longer available
I'd like to get the ski press against a wall w/ a layup table near by. The air compressor is tucked away in another work table, as well as the planer and other power tools.
WEBBOY, maybe this is an example of what you don't want your shop to look like
I will post pics once it's better organized. Have fun and I want to warn you that you are about to embark on an big adventure!!
unknownThu Oct 15, 2009 1:11 pm
unknownThu Oct 15, 2009 1:45 pm
lol! well perhaps not, but still thanks for sharing.
A somewhat unrelated question: how does that particle board work out in your press? any problems worth mentioning? I've been thinking of trying a cloth frame myself, but perhaps using a similar idea for the molds.
unknownFri Oct 16, 2009 6:52 am
The wood is OSB (oriented strand board) plywood in sheets of 3/4 x 4 x 8. Don't use partical board. No problems so far. I tested the deflection on it and it deflects under 1/8 inch (about 3 mm) which is acceptable for me. If I were to do it over, but still use wood beams, I'd use something like gluelams or lvl beams. I think that would have been easier to work with. In all it took 7 sheets of plywood. The entire press weight around 700 lbs.
Someone in the forum built a press using cloth/canvas material. I think they got good results.
Epoxy didn't arrive today so I'll be cleaning the shop tonight.
Have fun!
unknownFri Oct 16, 2009 6:56 am
I am building my press in my shop today. I got all of the materials all cut up. I am going to be angle grinding the edges (so I dont slice my hands open), sand it, primer it, paint it, drill it and assemble it all up and make a cinderblock stand for it so i dont have to bend over all the time while using it. So i will take some pics today as I am working and post them tonight. wish me luck
unknownSun Oct 18, 2009 1:06 pm
Looking forward to seeing the pics. Hope it all goes well. Good luck.
unknownMon Oct 19, 2009 6:13 pm
Here's a quick peek in my workshop - this first picture shows the room where I assemble stuff - especially glueing up - I glue cores together or glue sidewalls on, do edges etc - it's not a 'clean room' but I try and keep the dust to a minimum. Also doubles as the materials store.
image no longer available
This next pic shows the workbench with pillar drill and bandsaw - I use this bench to store tools and build little gadgets etc.
image no longer available
And finally the main workshop where I build cores and where the press lives. You can just see the base grinder in the background, the thickness planer which is invaluable for making cores, and in the foreground a new addition - we built a simple router table which makes cutting out with templates much more stable. The main long table is bolted to the floor and that's what I use for the main build processes.
image no longer available
unknownTue Oct 20, 2009 7:28 am
Your shop looks great dan. I wish I had that much room.
I spent most of my weekend moving lumber out of my small area.
Still have a small pile but got 95% of it out of the way.
The small pile that's left works great as a bench.
Seems like a good place to keep my molds etc.
If I could find a better place for my old kayak I wouldn't have to duck quite so much.
Built a shelf unit to store planer etc.
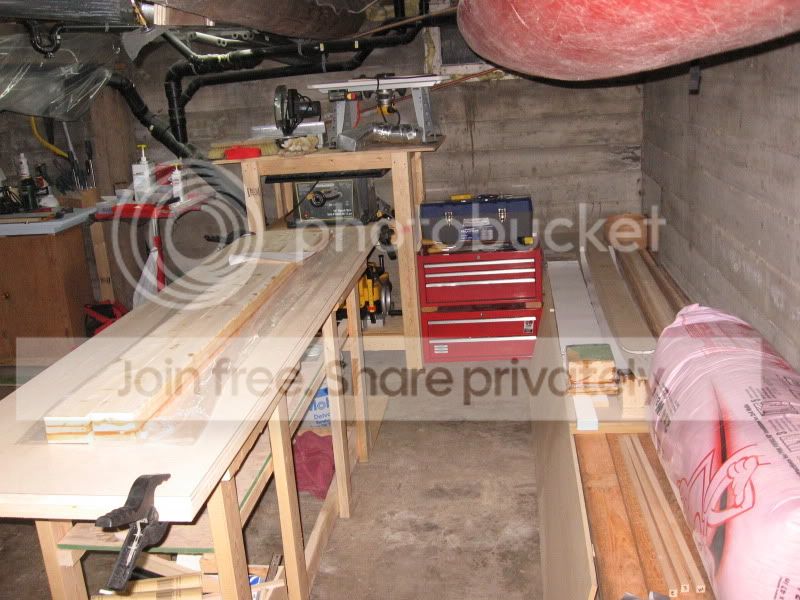
The area to the right of the bench was all piled high with wood.
now I can walk around my bench. YEA!!!
unknownTue Oct 20, 2009 5:47 pm
Thanks guys, keep the pics coming- this is exactly what I was after.
unknownThu Dec 10, 2009 7:00 am
I like the pics! A good organized shop doesn't really need to be big, but like you say it helps. I spent a good part of the weekend cleaning mine and I can actually walk in it with out tripping over stuff.
Now that my epoxy has arrived I'm bound and determine to get my first set of skis made by the end of the week. My problem is too many projects going at the same time and keeping it neat is a project all by itself. I'd love to take over more of the basement but I finished off the other part as a TV/hang-out room for the kids. And now they rarely use it. But it's nice to have the spare room.
As you can see my room is multi purpose too. All my work benches are on heavy duty wheels (400 and 500 lbs per wheel) so I move them around as out feed tables for the table saw or re-arrange them for cutting/supporting sheets of plywood. There's also storage for power tools, hand tools, etc., under the work benches. Try to get the most out of your work space. Figure out a consistent height for the tables that are comfortable to work at. All my work tables are about the same height and just a bit lower than my table saw to be used as in/out feed tables.
The bottoms of 2 of my benches are big torsion boxes. They are sturdy and can support a lot of weight. On top of the torsion box I attached simple cabinets w/ workbench tops on top of the cabinets.
SAMMER -build a 3 car garage, use 2 for ski building/workshop and 1 for the wife's car.
unknownTue Oct 19, 2010 8:10 pm
I am actually curious in seeing some of your guys' different ways to store your materials (shelves etc.) and your work benches. I have seen some of yours in this post but want to see some more and what works best for you guys. I am trying to think of some ways to store my materials so that they are easy to get to but also saving as much room as possible. I got some ideas, just wanted to know if you favor something specific.
unknownTue Oct 19, 2010 9:49 pm
Figured I'd resurrect this thread.
I keep all my big equipment on one side and all the small stuff and storage on the other.
image no longer available
image no longer available
The bench along the back was is part of a bowling alley which is pure awesome. The press isn't done yet but when it is, it'll have to go into another room which is currently full of crap. The bench on the left rolls out so I can do edges, sidewalls or whatever.
image no longer available
unknownWed Oct 20, 2010 5:34 am
Eric, too many chairs!
unknown
Almost! That rocking chair is about 100 years old and is made entirely out of quarter-sawn oak. When I get done restoring it, it'll be pretty sweet.
unknownWed Oct 20, 2010 2:38 pm
I like the rocking chair. Nice way to relax after a day in the shop. Here's a few updated photos of the work shop.
First pic is as you enter the shop. The best thing I did over the summer was to build a wood storage rack. Organized the wood, made a huge difference. Future skis in the making. The jewelry cabinet still not done... (argh)
image no longer available
Looking left. A new jewelry cabinet in the making on the work bench:
image no longer available
Center, old cat track waiting to be recycled:
image no longer available
View from the slider:
image no longer available
And of course the ski press in it's final spot. The wood against the wall are future skis:
image no longer available
unknownFri Oct 22, 2010 10:32 am
Funny, aside from the odd post, it's like a year to the day since the last pics were posted! I actually have a workshop now, so I suppose it's my turn.
unknownFri Dec 03, 2010 1:06 pm
haha, I'm waiting until the new CNC shows up...and I hope to put a Kegorator in by Christmas. Stand by for pics
unknownThu Dec 30, 2010 12:59 am
image no longer available
image no longer available
unknownThu Dec 30, 2010 12:47 pm
Now that's a shop!
unknownSat Jan 01, 2011 8:10 am
I thought the drum hoover suspended in the loft space of my garage was good enough ... doh. Nice shop guys! Hope the New Year brings you what you deserve. Happy New Year all!
unknownFri Jan 21, 2011 9:14 pm
so i finally feel like the labspace is ready enough to show off.
it is a little over 3500sf, separated into offices and workshop.
it was really an upgrade from the closet that we were in for the previous year. makes all the difference in the world to have space to move around while working.
we moved in this last aug and everything is together except for the woodshop (going in the main shop area)
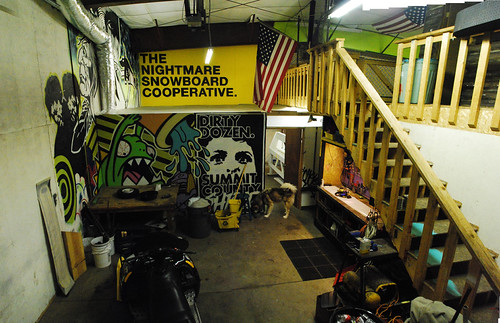
mainshop by strangesnowboarding, on Flickr
my biz partner joe does all of the paint, and there is still too much white everywhere. the main room will serve as the corefab/moldfab/woodshop and the covered room to the rear is our cleanroom (presses and material storage. upstairs we have the lounge, bar and tuneshop/finishing room.
the cleanroom is my biggest achievement. having layup occur in a sealed, climate controlled room that does not collect dust is key.
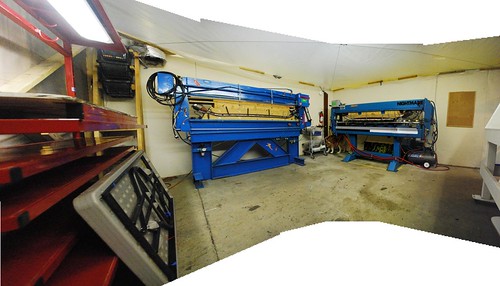
cleanroom by strangesnowboarding, on Flickr
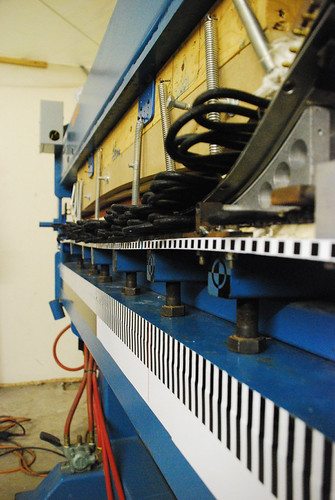
press1 by strangesnowboarding, on Flickr
the press on the left is a standard pneumatic press, burly and homebuilt in breckenridge. cattrack, heat top and bottom, and the wiring is pretty clean. this one requires top and bottom molds and can only go as long as maybe 170cm.
the press on the right is the spaceship version. adjustable camber via a steel platen and various curve transition points. adjustable tip and tail spacers (just have to machine the necessary arcs for new designs).
overkill pneumatics, heat top and bottom as well as liquid cooling for real production schedules. it will press somewhere up over 210 so skis are a possibility. this press came from the solid snowboards plant out in cali years and years ago. made its way to breck and then i got my hands on it two years ago.
we are still figuring out the intricacies but i love the design/build possibilities with this press.
we also have a couple layup tables, core/composite storage, mold cassette storage, and eventual dye sublimation press in this room as well.
moving upstairs now
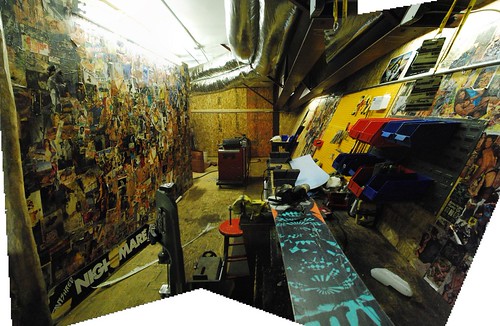
xxx by strangesnowboarding, on Flickr
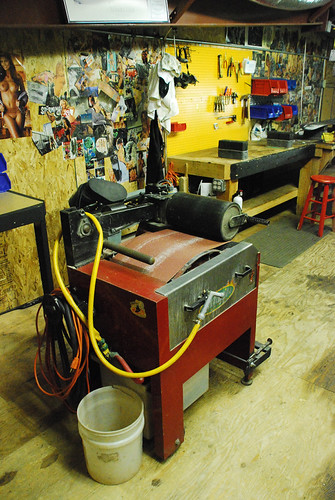
rite by strangesnowboarding, on Flickr
the xxx tuneshop is where we finish boards and keep em on the snow. kept it real with the porn decopage (sp?), grindrite, edgegrinder and buffer, router table, and 2 bench spots for wax and repairs. we have been using a metal bandsaw with a different blade to trim flash. it has a nice small base so we can easily cut the tip and tail out.
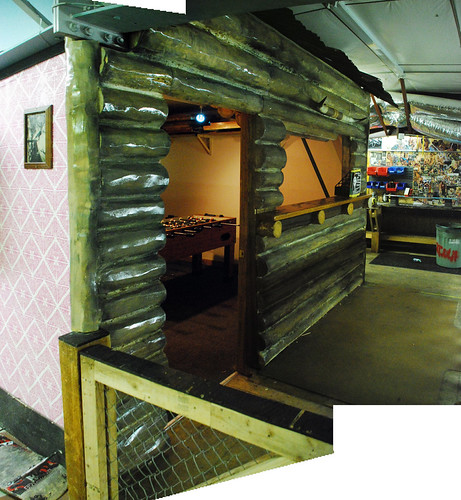
logcabinbar by strangesnowboarding, on Flickr
after several parties in the old warehouse it became apparent that we needed a bar here in the factory. one of my buddies dragged in all the logs, split them with a chainsaw and mounted em on the wall. we named the bar after him and have already broken it in with a couple ragers.
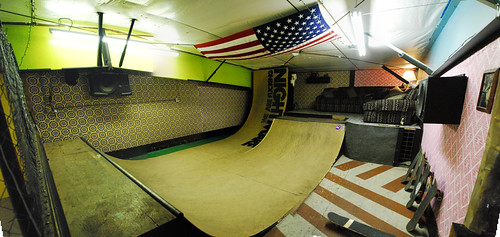
lounge by strangesnowboarding, on Flickr
this was the first room that we built in, a miniramp was necessary for our nightmare lounge, complete with couchland, one hole minigolf, and rad wallpapers courtesy of nakendandangry.com.
so thats the short tour, i will include more as we fill in over the next year or so. still waiting on the woodshop, shopbot and sublimation press/printer to really get into doing our own designs and graphics.
good building to everyone, thanks for stopping by
nightmare
unknownFri Jan 21, 2011 10:31 pm
haha that is just sweet. congrats!
unknownSat Jan 22, 2011 4:26 am
Wow, a workshop, rec center, and lounge all in one!
unknownSat Jan 22, 2011 5:53 am
Gone out to buy a bigger hoover ...
unknownSat Jan 22, 2011 7:36 pm
Dang Strange! That is a nice setup.
unknownSun Jan 23, 2011 10:56 am
wow, really nice, but it looks like one of those insulated mini plane hangars. with the curved roof and all. but really cool setup
unknownMon Feb 14, 2011 8:35 pm
http://s1213.photobucket.com/albums/cc472/brashsnow/?action=view¤t=IMG_2850copy.jpg
http://s1213.photobucket.com/albums/cc472/brashsnow/?action=view¤t=IMG_2849copy.jpg
This is where I spend 7 days a week 12 hours a day. It's beautiful. To me
. I originally had another shop, and had put down a killer floor but the monthly was just way too expensive
...maybe someday!
unknownTue Feb 15, 2011 10:39 pm
Yeah, I miss the wooden floor! :-) But as long as one can move around it's ok.
After the season I will expand my "shop". I have to build in an area that's not in use. Gives me some extra space...and a wooden floor. It doesn't have to be prime oak, something softer than concrete!


