:: View topic - Our first try.
Posts: 66 · 66 posts
unknownSun Mar 11, 2012 1:05 pm
Hey everyone, this is my first time posting but i've been lurking around and reading here for months.
Me and my friend started this project this winter and are progressing just fine (I think), we built a ski press and are soon ready to press our first pair of skis. (Made in Sweden!
)
I've tried to find answers to all my questions in this forum but there's always more stuff emerging as you try and figure out how to do stuff.
I've got some pictures of our progress and would like tips, do's and don'ts and all the help we can get if there's anything we missed.
When i've been a member for more then a day and made some posts I can show you the images!
What's left for uses to:
# Profile our cores.
# Bend and attach edges to base material. (and build an edge bender)
# Finish our press molds.
# Test the press at working pressure (if there's time)
I've got so much questions and first i'd like to ask what you guys think of my core thickness. I really don't know what to expect but i would like the skis to be soft for powder skiing so i was thinking 2mm at the tip/tail and 10mm underfoot. Unsure about everything in between though.
I would really love all the input I can get and I will get back soon to show any progress and in not to many weeks we will press our first snowboard.
/Sonny
unknownSun Mar 11, 2012 1:09 pm
Forgot to mention that the ski measurements are 160-135-145 @ 195cm running length.
Also I know that almost everyone is using heat in their setups. Is that critical or can you actually make decent skis without extra heat?
Pictures will be uploaded tomorrow, i know this thread is not worth much without them..
unknownSun Mar 11, 2012 1:39 pm
The general consensus is that heat is better than no heat, but it really depends on the epoxy you are using. If you are using an epoxy with a room-temperature cure, you are fine.
What are you using for core material? What are you using for composites?
With a ~20oz triax top and bottom, 2-10-2 core profile will be soft (depending on your core material), but great for powder. Those dimensions are awesome, thats a HUGE ski
unknownSun Mar 11, 2012 1:52 pm
Hi Sonny!
I am looking forward to see the pics!
Please let me know if there is anything I can help you out with. I am in Sweden too. Need materials? Contact me!
Cheers!
unknownMon Mar 12, 2012 9:58 pm
We decided measurements and used Snocad-X to print a split template, since we don't have access to a large printer. It was way trickier then we thought to get it straight and perfect!
Here are my skies, i think the measurements are 160-135-145 @ 195cm running length. reversed chamber all the way except 30cm of flat in the middle.
image no longer available
Here are my friends core for his snowboard, he later realized that the outer stripes of oak would be 99% trimmed off,
lesson learned until next try.
image no longer available
Here is the press we are building, hopefully it will provide us with enough pressure for our skis and snowboards. Not finished yet, but soon! If are calculations are right we should be getting aprox 15tonnes of pressure @ 4bar, with our two firehoses inflated. I really don't know if that is enough but we'll find out
image no longer available
My friend putting the wire through our steel cat track. We used 30mm square pipes all the way. I now see that people have more narrow pipes towards the tip and tail, do you guys think this will work for us?
image no longer available
Today we started building press molds for our skis and snowboard. This is my friends bottom mold and my top mold (mould how do you spell it?!). They are half finished, 22mm MDF board goes on top of that to get a smooth(we'll see about that) surface.
image no longer available
unknownMon Mar 12, 2012 11:00 pm
Ok, our epoxy should be fine at 20C so maybe we are in the clear
and Yes, it's a huge ski, build only for pow so i'd like it soft but not too soft (20oz triax it is)..
unknownTue Mar 13, 2012 12:15 am
Thanks yes, any help is greatly appreciated and i've seen your shop
All set for materials now but who knows in the future!
[swedish]Roligt med flera svenska byggare om in annat![/swedish]
unknownTue Mar 13, 2012 2:40 am
22mm mdf on top will be too thick in my opinion. I just did the same thing with 16mm mdf and it is borderline too thick. It will average out the profile somewhat due to the fact that it does not want to bend.
unknownTue Mar 13, 2012 11:10 am
looking at the large radius on your snowboard mold i think 30mm square cat track pieces will be ok. it is only when the radius gets tight that you get trouble eg. tip of a race ski
unknownTue Mar 13, 2012 11:23 am
unknownTue Mar 13, 2012 12:00 pm
Oh, yes maybe your right. I've been thinking about how to get the mdf to follow the curve of the profile. My plan was to cut stripes maybe 5cm in width for the flatter middle parts and then make the tip and tails in two bigger pieces and make several cuts from the backside maybe 15-18 mm deep so that it would bend properly. Do you think that could work? Thanks for the input!
unknownTue Mar 13, 2012 1:03 pm
Just looking at the press I'm wondering about the vertical tubes that are holding the top from the bottom. Are you concerned about that at all? I'm just curious because I've never seen it done like that.
unknownMon Mar 19, 2012 6:14 am
Hi, no actually those are the least of our concerns, each of those vertical are solid steel and and are good for 18 400kg of force, 73600kg if you count all four. Those two upper beams are only capable of withstanding 30000kg of equally distributed force along the 2,1 meter, deflecting close to 8mm. But we only plan to use half of that force so i hope we are in the clear. Time will tell
unknownTue Mar 20, 2012 12:50 am
Would a floating central brace would restrict the amount of deflection. Did you include a relief value in the set up?
unknown
You might consider filling in the gaps between those supports along the length a little more. Your mold pieces look pretty tall and strong so maybe it will be no issue, but the pressure may be enough to distort the MDF into those gaps, and overtime destroy your mold.
unknown
Hi, yes a central brace would probably make the press even stronger but since we really wanted the whole side open, for easy access, we won't we using any other braces. and yes, we have two relief valve to protect us
unknown
Yes, we have planned from the beginning to put 45mm of wood on top of those supports, both in the bottom and on top. First i thought that maybe even that won't be enough but now I believe that it will be sufficient to keep the mold straight. Do you think this is a good solution? Me and my friend have mixed feelings about using wood in this position, do you think it'll work or do you think it will deflect to much?
My nearly completed mold for my skis
image no longer available
Using the press to attach the top layer to my mold form, i've decided to forget about the MDF and instead i'm now using two layers of 4mm plywood. wich is very easy to bend into the shape of my mold.
image no longer available
image no longer available
Attaching 45mm of wood to the bottom of our press with glue, using our firehouses to apply pressure. (We will also attach 45mm of wood to the top of the press)
image no longer available
unknown
good call on the 4mm plywood to "skin" your mold with. Much better idea than the 22mm MDF!
Everything is looking pretty good!
unknownTue Mar 20, 2012 1:25 am
Another thing I notice is the lack of threaded rod to keep the mould together. I am not saying it won't work, just an observation.
unknownTue Mar 20, 2012 12:13 pm
Your setup is lookin nice.........One slight off journal question here. I see many Levels sittin on or around peoples presses. My basement has a slight slope in the floor.
How important is it to have the press dead level?
I would guess the concern is that the epoxy might flow in the direction of the slope and create dry spots or uneven curing, but will a few degrees matter? Is it worth shimming my press!
unknownTue Mar 20, 2012 5:29 pm
I would say it wouldn't make a difference but it sure can't hurt to get it level.
unknownSun Apr 01, 2012 10:18 am
So this weekend we spent on the project and we got some stuff done.
The closer we get to pressing our first pair, the more we realize how many things we could have done different, and how many things we could have done better. I guess we will have to accept that this will be more of a (hopefully) skiiable sample try.
We glued the edges onto the base usibg epoxy. Bending the edges was a bitch, as expected. And the result was not as good as a would have hoped, but will do for our first pair. Realizing how much easier it was to NOT make a full wrap I decided to end the edged before the tip and tail butOne thing I realized after glueing them was that we should have made the edge of the base where the steel edge go a bit narrower. Like a cut to make the transition from steel edge to no steel edge smooth. (do you follow me?)
How do you guys solve that problem?
We also put the first mold into the press and attached it firmly. Tried the press at our planned working pressure about 15,000kg. It didn't even make a sound, very undramatic but safe I guess. Is this preassure enough? How much preassure do your presses generate calculated in weight for easy comparison?
Last we made the router bridge and started figuring out what core thickness to use. I would love some input. And thoughts here from more experienced people..!
My skis are 160-134-150mm with 40mm full rocker and 35cm of flat under bindings. Our enforcement layers are 600g(21oz)/m2 triax fiberglass
My core is spruce with two oak stripes under the binding screws.
What do you think of 2,5mm running 15cm to 11mm for 40cm under foot to 2mm running 15cm.
Is that totaly off? What changes would you make?
Next weekend we hope to be able to press our first pair, I'm so excited and nervous.
Our press, with my friends snowboard mold fitted and ready to go. The fire hoses will be shortened soon...
image no longer available
My base with edges attached. Note the tyre tracks, thats an interesting story...
image no longer available
unknownMon Apr 02, 2012 3:19 am
looking at that last photo I have one major question : the side of the base we see on the picture... is it the abraded /flamed side ??? I'm seeing some kind of abrasion texture on it... I hope not.
Send some pics of the pressed board when it,s done ! Keep up the good work !
unknownMon Apr 02, 2012 5:01 am
Dubbdck! :-)
unknownMon Apr 02, 2012 7:54 am
Too bad those tires tracks couldn't be permanent, makes kind of a cool base graphic!
The press looks fantastic, you guys are going to get some great results I bet. Looking forward to seeing your first pressing! Good luck!
unknownThu Apr 05, 2012 1:48 am
Hi Sonny,
You were asking about how to transition from edge to no edge. I think most people tack on a 2mm thin strip of plastic around the tip/tail. There are a few photo's here and there within the forum.
Finding the right epoxy to bond on the edges is a tricky task. You might find it easier to use PE masking tape, per Boheme skis video. Tape is only 0.07mm thick, so the in-print must be nominal. If you don't like this approach, speak to Bison, they have a great neoprene adhesive, but you will need to use 0.25mm tips. Run a single bead of adhesive along the vertical inner edge, join when wet - so not per the instructions on the packet.
unknownThu Apr 05, 2012 1:53 am
Your mate like a bit of rocker in his boards hey?
unknownFri Apr 06, 2012 12:52 am
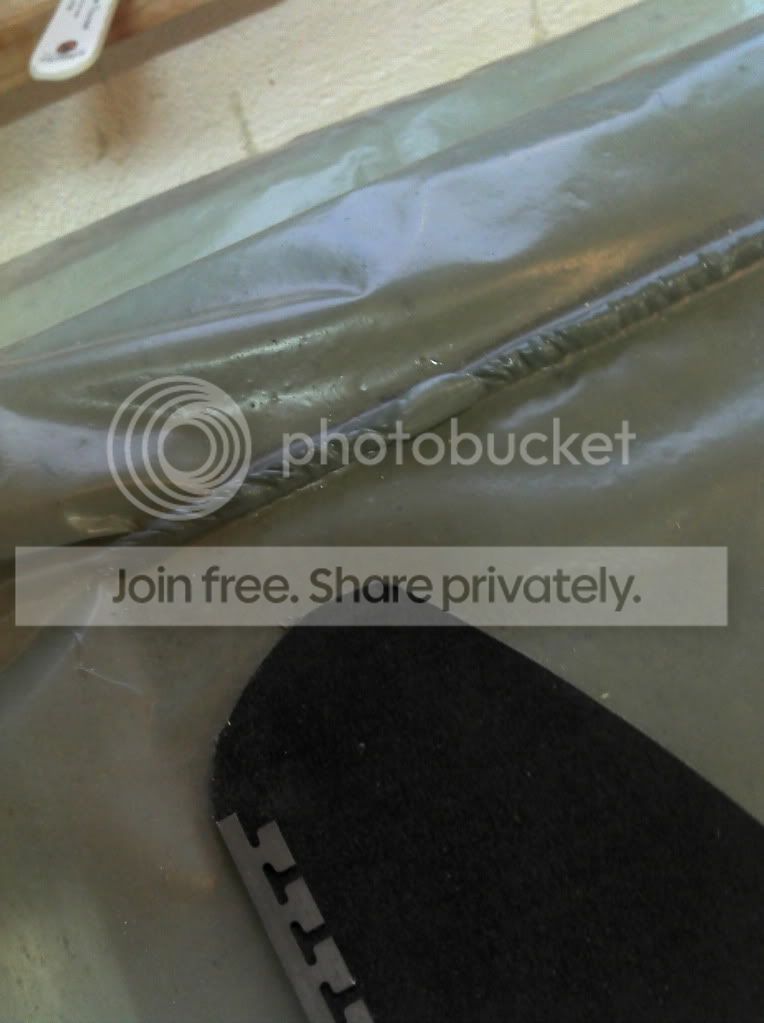
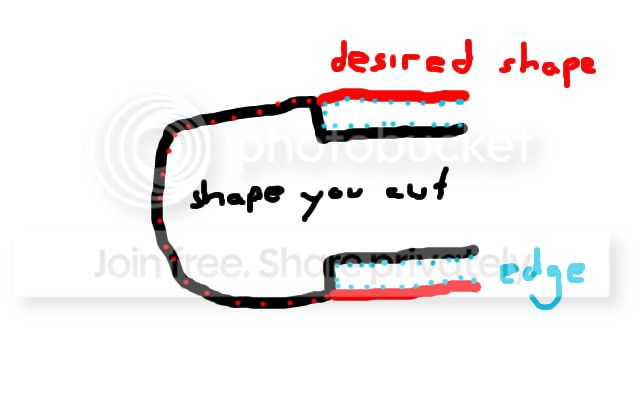
this is how i do (and i think most people)... include the edge in your first draw, then draw a second line two millimeter more inside, cut along the second line and there you go...
edit: not sure if i made that point easy to understand, so i had my cat do a drawing with her tail to illustrate...
unknownFri Apr 06, 2012 1:48 am
that's a pretty smart cat!
unknownFri Apr 06, 2012 10:43 am
I honestly think our base has the exact same texture on both sides. I may be wrong but i couldn't see any difference, so I hope I'm not wrong.. :S
unknownFri Apr 06, 2012 12:25 pm
Yes, inte alla som har snna fina spr under sina skidor!
unknownSat Apr 07, 2012 5:37 pm
Thanks! Hmm I really hope the tyre tracks will be removed in the first grinding..
unknown
Yes, both his snb and my skis are built for powder only. We may have over done it and we will soon find out. Hehe.
unknown
I read your answer several times and i'm not really sure what you mean with the thin strip of plastic but I think I got it,. "AllguSki"'s images make sense, thats how i'll do it next time...
unknown
Thank you, thats exactly what i wanted to see. Thats definitely how I'll do it next time. I honestly didn't think about that problem until i had already glues the edges on. With the first pair I guess your bound to make some mistakes, and this was definitely one..
-------------------------------------------
This last couple of days we have made some progress!
Me profiling one of my cores into the desired shape.
image no longer available
Gustaf my friend, profiling his snowboard core into final shape.
image no longer available
Gustaf, cutting the fiberglass into stripes for his snowboard.
image no longer available
The shiny fiberglass blanket..
image no longer available
# We managed to profile our cores into the final shapes.
# We bought proper gas-protection masks. Do you guys use eye protection glasses?
# We cut tip/tail spacers for our snowboard/skis
# We are currently pressing a sample piece to see that everything works as it's supposed to.
# We had a friend make a top "cassette" (is that what you call it, the sheet of metal on top of the top sheet when you put the skis in the press?) Also, how thick metal do you use for this? Our cat-track is 30mm square pipes..
Tomorrow it's D-day.
unknown
I press at 80psi. Because i've found that is what seems to work best for my heat and epoxy combo.
Too much epoxy won't ruin your board. It will just make it heavier if you don't get a lot of squeeze out.
As for epoxy, mix it in small batches as you go so you dont over estimate Just have some cups ready to go with epoxy measured out already so that all you have to do is add hardner and mix.
Good luck! have fun!
unknown
This is the way to go guys! Good luck tomorrow!
//M
unknown
so how'd it turn out guys!?
unknownSat Apr 07, 2012 6:28 pm
I'm just going to say NEVER attach your edges with epoxy. I build a lot of stuff and that's something I would never do.
unknownSun Apr 08, 2012 12:28 am
Guys! Use super glue to attach the edges on the base before layup..
Sv... Hur har det gtt, blev det bra?
unknownSun Apr 08, 2012 11:45 am
Ok, we DID attach our edges with epoxy. Seems maybe that might have been stupid
We'll soon find out. In a couple of hous I'll post pictures. We have not yet opened the press. We had to celebrate our potential sucess yesterday so today is a bit slow..
Swe: vad fr slags lim anvnder du Fr att fsta kanterna"deepskis"? Och vilken epoxy kr du med?
unknownSun Apr 08, 2012 12:21 pm
Okay, so the first board is out of the press.
image no longer available
Actually came out better then we expected! The top sheet is clear and the only graphic is a rock band sticker underneath. The finishing will probably be done tomorrow after the epoxy have cured a bit more, and we gotten our hands on the right router cutter-piece-thingie (whats it called?).
One unexpected thing was the loss of rocker. We expected the board to loose about 10-15mm of negative chamber but when we put it back in to the mold the difference was around 30mm. Why is that? Anyhow, thats not all bad. He might have been a little to excited when choosing the rocker measurements, this version might be a little more useful
This picture is all i got for now but tomorrow i'll bring my DSLR and take some real pictures. Another question, how does your snowboards and skis compare to commercial ones when it comes to weight? We haven't measured the weight yet but I'm very curious.
All in all a very successful first press, no idea when we get to try it on snow but when my skis are finished in a couple of days we sure are going to look for some snow..
unknownMon Apr 09, 2012 12:28 pm
Use loctite super glue, works perfect
West system works ok for your first boards/skis. Easy to find and works fine without heat.
Nice work!
unknownTue Apr 10, 2012 12:13 pm
Nice job!! Looks great for a first pressing. How is the base flatness?
It's called a router bit.
As for weight, the skis I have made are a bit lighter than something similar from the commercial world, but not by much. mine are very basic and with bamboo cores, so not a lot of gimmicky stuff to add weight.
unknownTue Apr 10, 2012 1:30 pm
So my skis are in the press right now, I'm really excited to see them come out of the press tomorrow... I'll definitely post some more and better pictures then.
image no longer available
image no longer available
image no longer available
image no longer available
unknownWed Apr 11, 2012 4:49 am
Fresh out of the press!
image no longer available
Cutting my beasts loose!
image no longer available
Proud ski builder!
image no longer available
Pretty nice rocker profile, as mentioned before these skies are for powder only.
image no longer available
My new skis compares to my Vlkl Gotama 186cm.
image no longer available
Ok, so the skis turned out really good actually. I'm very impressed with the flatness of our bases. They are pretty near perfect. I just can't wait to finish them up and removing the protection sheet on the top layer!
I'll def post more pictures then. First i need to get my hands on the right kind of router bit..
I'm soooo happy right now, and looking forward to making my next pair. I'm also shocked that they actually weigh less then comparable commercial skis.
I took one and read 2480g, and still there are stuff to be trimmed away.
Compared to k2 hellbent 189cm @ 2780g thats good in my book.
The final measurements are something like 164-140-151 I think
Pretty massive but the idea for the skis are to be optimal for our planned return journey to Japan next winter. Me and my friend went there last winter and my god they get A LOT of snow.
unknownWed Apr 11, 2012 6:45 am
Now we're talking! Good work!
Wait til after the post cure! One week in room temp.
unknownWed Apr 11, 2012 12:18 pm
Good work! they look great!
unknownThu Apr 12, 2012 11:14 am
Those look fantastic! Great example of how doing your research and planning things well pays off. Nice work! Those will be a blast on the mountain!
unknownThu Apr 12, 2012 11:36 am
Okay so the honeymoon is over, my unconditional love for my first skis are already transitioning into me looking at them with critic eyes and searching for faults and ways to improve them. (theres a lot to be learned..)
First thing I notice is the air bubbles and the white fiberglass in the epoxy, why is it there?! Was there not enough epoxy? Were there not enough pressure, or even maybe to much?
Help me guys what did I do wrong..?
image no longer available
image no longer available
image no longer available
unknownThu Apr 12, 2012 2:09 pm
that first picture, the white line going diagonal on it is deff from the cat track. The edge of the aluminum put to much pressure in one place. You may want to add a couple sheets of metal under the cattrack to smooth that out.
What pressure did you squish at?
unknown
Lots of fiberglass showing means there is not enough resin - that could either mean you didn't use enough, or too much got squeezed out (too much pressure). I'd also be curious to know what pressure you guys used?
The bubbles are a bummer... I'd say more pressure would help squeeze those out, but you've already got dry-ish fiberglass, so you don't necessarily want more pressure. I can't remember, are you guys using heat? The less viscous the epoxy is (warmer), the easier it'll let bubbles out.
unknown
Hi!
Looks like not enough resin to me..
The router bit is on its way
unknownThu Apr 12, 2012 8:58 pm
We are currently not usng heat but that is definetly planned to be added soon.
Thef preassure in the 2 firehoses were 5,2 bar or 75 psi, but since they have some gap to fill they only had about 95mm contact surface each. But and since the ski are between 160 to 145 mm wide. So i guess the preassure at the skis would be close to 50 psi? Could it maybe be a combination of to little resin and maybe not enough preassure?
unknownFri Apr 13, 2012 4:57 am
Ah yes of course thats the cattrack, i'll do what you suggested and put insome metal sheets there..[/b]
unknownFri Apr 13, 2012 7:26 am
How did you wet out the fiberglass (did you use a spreader, or a roller to apply the resin or some other method?). I'm with Twizz on this, it looks like your fiberglass wasn't wet out enough and possibly not enough pressure at the ski.
And do you have an idea what the room temp was at the time? Also, did you hot water bath your epoxy before you guys mixed and laid up.
And finally, how did you mix your resin?
Sorry for all the questions.
unknownFri Apr 13, 2012 9:48 am
I have the same thing happening on my skis : the fiberglass still shows a bit when I have a clear topsheet... I also noticed a few "dry" fibers when I bevel the edges of the topsheet after I cut the flash.
Here's how I work :
- my resin is stored at 27 deg C, I only take it out of the "temperature controlled closet" when it's time to add the hardener and use it.
- The temperature in my shop is only 16.5 deg C (when outside temp is below that)... radiant heating in the floor so I don't need more to be comfortable... maybe it's too cold as the triax is @16.5deg then... so the resin cools down and looses some "fluidity ?" when in contact with the fiberglass...
- I mix the resin with a mixer arm in a press drill
- I spread the resin in/on the fiberglass with a plastic spreader, not a paint brush or a roller
I suspect I don't get a good enough resin impregnation. The resin is pretty "thick" even at 27C and if I remember correctly when I used to use the West System Epoxy (very liquid) I had better soaking.
How would you improve it ? Could a "bubble remover roller" help ? Should I heat my layup table ? Should I just change my resin supplier and get something more liquid ?
... any idea would help !
Thanks !
For the first time I'll make skis in the summer (this upcoming summer), maybe I'll see some improvement with warmer temperatures...
Oh and by the way even with some dry fibers in my skis, the planks are holding strong... I'm not such a hardcore skier though.
unknownFri Apr 13, 2012 2:14 pm
Questions and help is very very welcome!
Our workshop is around 15-20'C when pressing, and the epoxy is stored in that temp also, maybe thats to cold? No heating of the epoxy what so ever. Anyhow, then we mixed it by hand in a round glass container, with a wooden stick, for a couple of minutes. Then we poured it into another bowl and mixed it some more. Then we poured it onto the skis, spread it with a plastic sheet and used a soft roller to wet out the fibers. At some spots we even used a aluminum roller to remove some air.
My friend also had some problems with air in his snowboard but i know for fact that he used a lot more epoxy since that was a lot being squished out when we put pressure on it..
What pressure do you guys have At the actual ski/snowboard?
unknownSun Apr 15, 2012 1:39 pm
I press around 50psi in the hose. With the cattrack, and depending on the length and width of ski (I press one ski at a time) it comes out to maybe 60psi at the ski.
unknownMon Apr 16, 2012 2:50 am
I had some thoughts of the dry glass/ air bubbles:
For Ben: could the drill mixer be inducing air bubbles into the epoxy? If so my suggestion would be to let your epoxy sit for a bit to le the bubbles rise and dissipate.
For everyone: are you overworking your epoxy? If you overwork your epoxy you can create a cloudy/foamy look to it. This is introducing air bubbles.
Other than that maybe a warm water bath to decrease viscosity and allow for butter wet out.
Ben, you might just see better results in the summer with warmer materials.....
For psi, I'm pressing at 50-60psi in the bladder. but I've never used clear top sheets to look for the air bubble problem either....
unknownMon Apr 16, 2012 3:25 am
For bubbles research 'voids' and 'de-gassing epoxy'.
Sonny/Ben - raising your epoxy to 30 degrees before consolidation should be enough to ensure the fibre wets out really well. I wouldn't go much above this temperature, a sleeping blanket under a spare thin sheet of AL should do this for you. If you head in this direction, you might as well consider whether applying the fibre to a film of epoxy is better than the traditional approach.
Sonny - great work btw!
unknownTue Apr 24, 2012 1:04 pm
laying the fibre on a film of epoxy rich? that works better? I guess I can see it.
unknownWed Apr 25, 2012 8:09 am
Thanks for the replies guys !
Vinman - yes the mixing does introduces quite some bubbles AND I might be overworking the epoxy a bit, sometimes I see the white/cloudy/foamy aspect you're talking about.
I'll see how it goes in the summer with warmer temps, I'lla also let the mixed resin sit for a couple minutes so the bubbles can dissipate !
The specs sheet of the resin states to store it between 20 and 30 degress C, I went with 27 and I'm OK with the viscosity, tried 30 degrees once and didn't noticed a big difference. I dont'want to store the resin too warm either (hence the few degrees below the max recommended temp).
One thing that should be good for me though is the fact that when temperature is applied to the resin (in the press for curing), if I remember correctly the rep told me that in the first minutes of the rising temp, the resin's visosity dicreases significantly. That would help with the wet out... or the squeeze out...
BTW I press @40PSI so I don't believe excessive pressure is a problem... but the 40PSI is applied on every square inch of the skis though... the fit is tight and the bladders remains pretty "flat" !
Thanks again
unknownMon May 07, 2012 1:00 pm
Ok, so tomorrow I'm heading north. Finally i get to try the fruit of this project! for 10 days me and my girl will be skiing in the north of scandinavia and I'll be sure to post some awesome pictures
I am bringing two pair of skis since the ones I made are fitted with regular bindings and the other pair with touring bindings. If everything goes as planned and the weather is cooperating I'll be heliskiing with my own hand made skis on this friday. (GOD I like the feeling of my OWN skis)
Don't check back in this thread if you dislike nice nature pictures.
(google images for "skiing lofoten", thats where we are heading)
I'm am SOOOO excited!
unknown
The word "jealous" does not do justice here. That is AWESOME. Have a great/safe trip!
unknown
So, we are back from the trip and I finally got to try my skis!
They were actually better then i would have dared to imagine, skied really well in chopped up powder, carved pretty alright in softer groomers and were a lot of fun and charged untracked powder like a beast! Love the length of the skis, (194cm) and the even with that somewhat extreme width they didn't feel too heavy..
This is definitely something to work with. I wish I have had the chance to let somebody neutral try them but unfortunately one of my heel bindings pulled out of the ski after a landing a drop, this happened the day before our heli skiing and I didn't remount them coz we were going home the next day..
I did shoot some video with my helmet cam, I'll definitely post that later so you get to see them in action!
Who's looking forward to winter 2013?!
I am!
The skis on snow!
image no longer available
Girlfriend skiing down after a couple of hours hiking in northern norway.
image no longer available
