
Wed Oct 07, 2009 3:49 pm
Skevik Skis Layup Video
Skevik Skis Layup Video
wow. great video and ski alignment. Are you doing wooden sidewalls?
yup. same as the core: maple. we started fooling around with UHMW for sidewalls, but didn't have the time to press a pair as we ran into a few problems. hopefully next year.
are you aware that skevik is a typical scandinavian name for a place at the coast with very little snow and not necessarily good skiing terrain?
(vik=small bay)
part from that, everything looks very nice. I think you will find that there is no need for plastic walls, hard wood is just as strong (and it looks better)
cool edit!
The name Skevik is the name of a small bay in the Stockholm archipelago. Like Endre said, not that well known for it good skiing terrain.
Real nice video editing!
super bitchin'
I really like the lay-up table with the rack underneath!
skis look sweet too....
R
Seriously cool video guys, well done! Really gets me in the mood to make some skis (its been a few months since I have, haven't even looked at our ski making stuff all summer... time to get back into it I think!)
I REALLY like your edge bender. That is exactly what I had in mind to make, looks like you have adjustable bend radius too, awesome. Did you make that thing from scratch?
awesome, love the video, looks like you guys have a nice setup!
Added to favorites !
I'm also interested in the edge bender... made from a mix between a press drill vise and a brake line bender ?
Great work !
endre / brandt: We selected the name Skevik, as it was our great father's last name. He was Norwegian and migrated to Canada around 1900. But no, I wasn't aware of the place with the lack of good ski terrain. Anybody else have any further insight of the name Skevik?
twizzlestyle / ben_mtl: Ya the edge bender works awesome! We have tried everything before this was built: bender as shown in how-to section and the modified tube bender as others have done. We found these time consuming. This design you just insert the edge, set the desired radius, and feed through. Guess it depends on the shape of your tips. It works good because of the close contact points (minimizing springback) and it bends the edge along the whole curve (opposed to the modified tube bender). We had a machinist turn the rollers for us and we assembled the rest to a drill-press vise.
You don't have any close up photos of the edge bender do you? I've had this idea for a while but never sure if it would work very well or not, and clearly you've shown it does so you've inspired me.
Great video! I like the ski alignment and especially the edge bender. I just bought a hand held bender today for $6.00. It's very basic. I tested it out today. It works if you take your time. But your's is really nice! Great Job.
WOW!!!!!!!
HOw many pairs are you building?
cool video! that edge bender looks great i have been thinking about making something similar. So it looks like you are wetting everything out first on a separate table then transferring it over to the final layup area?
twizzstyle: Don't have any close up photos right now, but will try to post some pics in the next couple of days.
MontuckyMadman: We built about 6 pairs at the end of this summer. We hope to press another 8 or so when I come home for reading break.
bobbyrobie: Yup, wetting the fiber glass separate then doing the layup. Think we tried it after watching the Kingswood layup video. Works good. What are others doing? Wetting-out with layup or separate?
We use wood sidewalls. They have been working great so far (15-25 days on each of the skis with just minor chips on one that we filled with some epoxy). We also wet out the fg on a separate piece of uhmw before layup after our first build. We did this after watching the kingswood video as well as some others that do it this way. I think it is easier.
Do you have any closeup photos of your vacuum hold down table for cutting out the base material? I would like to see how that works in detail. Awesome work on all fronts. I like the name too.
Got some shots of the edge bender. Just so you get an idea for size, the rollers were made from 2" stock.
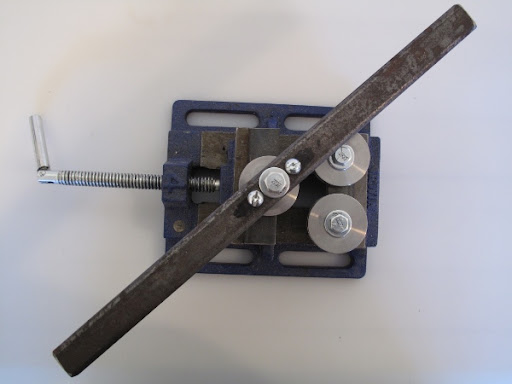
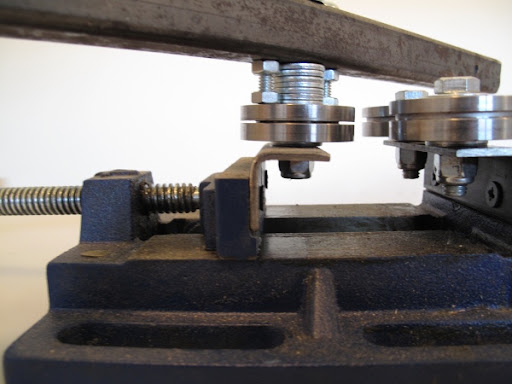
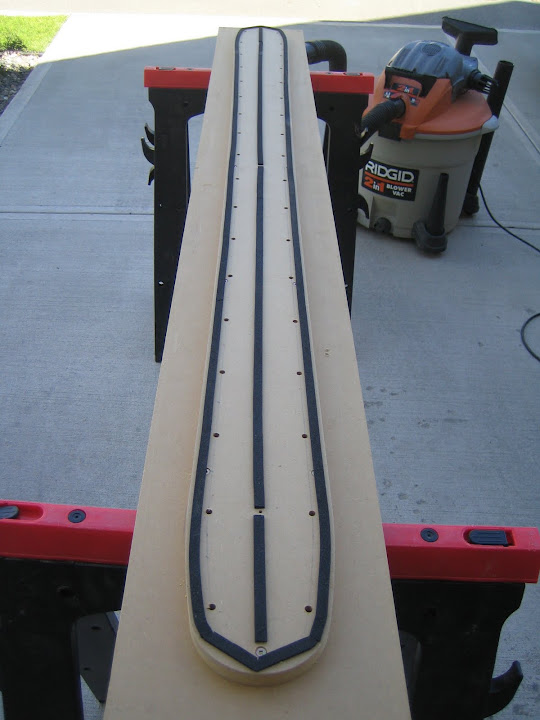
Don't have any photos of the vacuum base template and the foam tape is not on there right now. Basically, the foam tape goes around the perimeter and just inside the tape are holes spaced every few inches connected by channels to the vacuum.
i do separate...
Nice work.
Looks like you've got it dialed.
Thanks for the edge bender pics, Ive been looking for something like that.
I'm still curious about the software for epoxy amounts? Whats the deal?
Great quality video, thanks.
I layup on my one and only table. My work area is only about 5' by 9', so everything gets done there.
sam
Thanks for the bender pictures, building it on a small vice is genius! I've got another project now
How do you know exactly how much of an angle to put on the bend? I want to make one but for snowboards. I know I would probably have to make the wheels bigger and further apart, correct? I just don't even know how I would start to build something like that.
Nice work guys!!! Thanks again for your contribution.
No you could use the exact same rollers. Adjusting the vice adjusts the radius of the bend bigger/smaller. You'd have to experiment to figure out what adjustment gives you what bend radius.
sammer: The "software" is just an excel spreadsheet. It's just a quick way to mix the epoxy. Pour the resin and enter the weight, which gives you the correct amount of hardener to pour. Then depending on how much epoxy you want to use for the whole layup, it will tell you how much to pour for the second batch of mixing.
nick: Ya, twizzlestyle is right. Anybody could use the same setup as in the pictures.
Also, found an old picture of our vacuum base template:
... update of the last few months.
We were trying to get a screen made in the summer for printing graphics. Long story short, we received the screen three months later as the people making it made mistake after mistake. As I was then back at school, we just managed to print a few graphics and press a few pairs of skis for this season.
We used Nazdar ADE Series Epoxy Screen Ink to print the graphic on the bonding side of our UHMW clear topsheet. This was our first time screen-printing and the people making the screen for us thought we were nuts to take on such a big screen for the first time... who doesn't think ski builders are crazy to take on such a project? We made a vacuum table surface with the intention to hold the topsheet flat while lowering and lifting the screen, but there was not enough suction to hold the topsheet down. With time running out, we said screw it and used tape on the corners and hoped the the ink wouldn't smudge as the topsheet was removed from the "screen-printing station." Overall, I was pretty happy with the results for our first time. Suggestions for other first timers, don't put too much detail in your graphics as it may not come out as clear as your design.
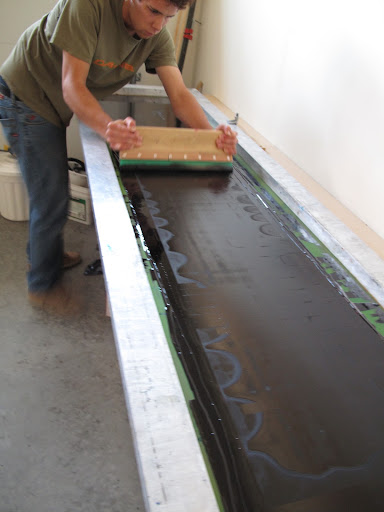
Printing some graphics.
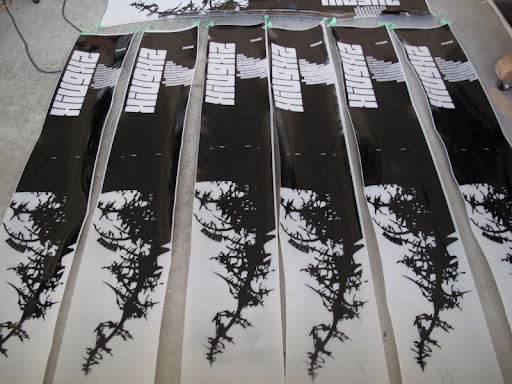
The mirrored graphics drying. Some of the detailed portions of the graphic came out a little blurry in some prints.
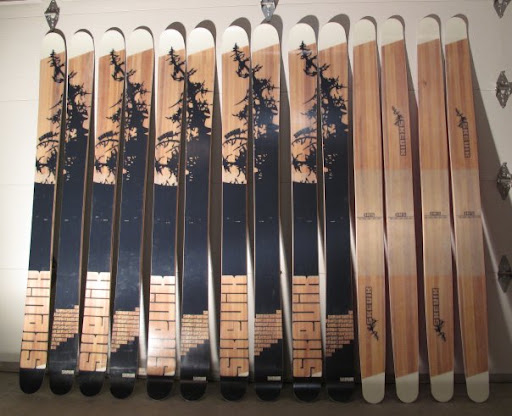
The final product. The right two pairs of skis are reverse camber / reverse sidecut with just rice paper used for the graphics.
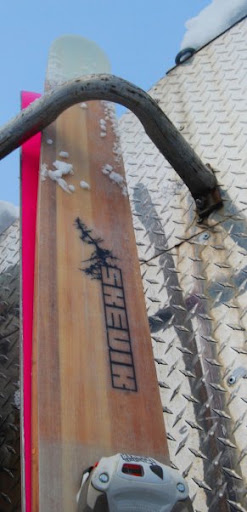
I enjoyed learning the screen-printing process, but would like to figure out a different method, such as sublimation. Screen-printing is limited in what you can do (colours) and costs too much for the quantity we're doing. Then again, I don't have much info on sublimation as I can't seem to find anyone to do it.
Looks very nice, that is a large screen for a first-time attempt. I took serography (screen-printing) along with a bunch of other printmaking in University, so I know it can be a challenge. However, silk-screen can have many colors and details, just look at a t-shirt.
Do like the graphics though combined with the wood. Is the close up shot Cat skiing?
those grafics are really nice! keep on the good work!
So true! I've heard the same comment a few times too. That's why my skis are called "SECTION8", a term referring to some body who is crazy, nuts, mentally unstable...... Remember Clinger from the TV show MASH or the movie Kelly's Heroes (from the 70's)?
Anyway.... Graphics are like the icing on the cake. Excellent job on the graphics!!
Skis look amazing. I really like the graphics where you can see the wood cores below the skis. What fg are you using? It looks like you have another piece in the binding area. What weight do you use there?
I agree the skis look great.
With the screen printing did you just print with that specific ink onto the abraded side of the topsheet? What type of plastic did you use for the topsheet and did you have to do anything after you had printed it to help with bonding?
thanks
yup, close up shot of the skis are from cat skiing. my brother went last weekend to an operation near Nelson, BC.
for the fiberglass, we're using 22oz triaxial. we use that below and above the maple core along with an additional layer for extra binding reinforcement.
the graphic is printed on to the bonding side (abraded) of the UHMW topsheet. With Nazdar inks, you can buy a snowboard catalyst for the ink just for this purpose. squeegee on, let dry, then laminate.
http://www.nazdar.com/pdf/ADE_TDS_Rev_8_072009.pdf
thanks for the comments
Merry Christmas
Thanks redbull.
I want to try and do sone screen prints in the future. Maybe not full length to start! I also have a friend who does lino cut prints which I reckon might be able to utilise the same ink as the screen printing.
The dye sub printing looks like the way to go for more complex designs. There is a place I think in the Seattle area that does this. I've read it on here before. It was in a thread associated with iggy from on3p.
Here it is from page one of on3p thread
Good looking ski's!
And nice inovation with your edge bender and shop space use!
Nice to see other builders work from here in the valley!
I am based out of kelowna. Would love to get a closer look at your ski's sometime if your ever ripping up at big white.
hi skevic bros, nice vid, i like the sound.
have you guys thought about mounting your edge bender under/through a workbench with just the rollers sticking out on top of it so that you can work with the base on the bench next to it as a template? if you had varying radii like for snowboard tips that would be nice, same for serrated edges.
also, what is the material of that sheet on top of your heating blanket called, between the cattrack and blanket, i have seen stuff like that before, not sure what it is.. does it resist the pressure no worries? would be nice to not heat the cattrack as well i guess and even out the cattrack surface..
cheers andi
hey andi,
we don't need to use our edge bender very much (we do 3/4 wrap now). for the models that we do use it, we just figure out roller position and bend length; therefore, don't need to have easy access to base.
I believe that material is called masonite board or hardboard. we still do use it, but our cattrack still heats up... probably not the best barrier.
thanks for your answer.
my impression was that filing down the ends of the edge and bending them to fit inside the board/ski at the exact same spot as the base inset ends is at least as laborintensive as bending the edge all the way around. or do you have another, quicker aproach?
masonite, yeah thats the one. cheers.. i wonder why the cattrack still heats up, should be quite a good insulator. i used a sort of thin textile fleece, bit liked cooked wool. not the best solution but better than nothing at all.