Archive › Equipment and Tools (e.g., ski press, core profiler, etc)
Cloth fabric ski press
Equipment and Tools (e.g., ski press, core profiler, etc) · 26 posts
shopvacFri Mar 20, 2009 6:52 pm
I have wanted to make a thread that shows some ideas on how to build a ski press if you plan on using fabric like Plywood or I have done. I got an email from a guy in France that wants to build a ski press using the cloth bags and he sent a very nice cad drawing on what he is planning to build. He said I could share his design with the community, so here it goes.
Here is the overall press:
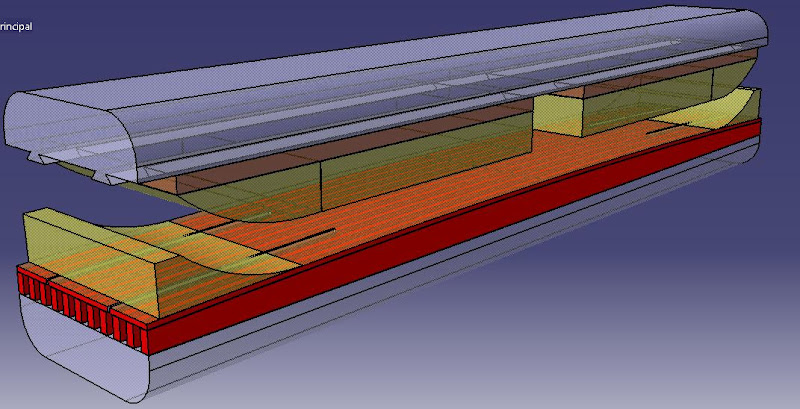
The materials haven't been picked out quite yet but he has some ideas of what they might be. They are as follows:
Blue: massive wood like fir or maybe MDF
Red: MDF with plywood on top, maybe (I think think MDF is the best)
Orange: wood or MDF
Yellow: MDF
Top mold might not be made totally from MDF he says.
His plans are to make it a double ski press that is roughly 15 inches wide (40cm). I am not sure if this is a good idea but from the look of his design I think it might work due to the very thick and well rounded over blue sections on the top and bottom. Making the blue parts separate from the bottom camber mold and the top mold will make the press very strong. I do think this press with be very heavy and a bear to slip the cloth over the entire mold pieces. I know from experience it is tough to load a double ski press. All of the layers drawn above add up in weight as you probably can imagine.
I think his drawing is very slick. I don't personally know how I would make the huge round over on the blue parts. I don't think my 1/4" roundover bit will work. Any ideas? It is very important to round over all the edges that will be touching the fabric. DO NOT have any sharp points or sharp edges. This is what ultimately ripped our first duck cloth bags.
Otherwise, if he can build this press as he has drawn it on the computer it will be very nice. Notice how the top mold slids on the dovetail rails. Also the tip and tail pieces on the bottom have similar ways of sliding while remaining in the right spot.
I think the key to building a ski press that utilizes fabric instead of steel is to make the bottom and top molds very thick and beefy. I would also say to make them the same length as this design shows. This will make it much easier to load. Make the top and bottom molds at least 3 inches thick.
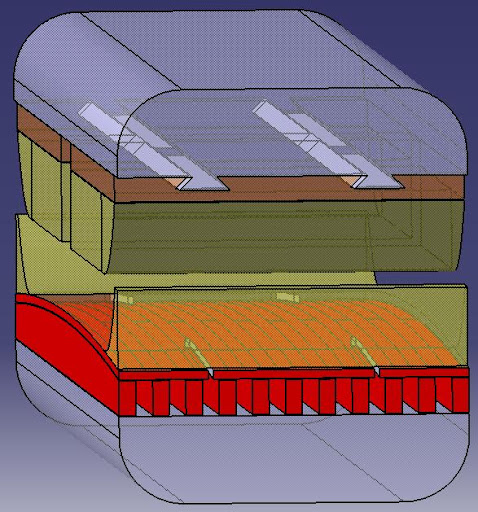
He was very excited to hear MontuckyMadman can provide the cordura fabric as it is hard to find in his area.
For ski presses that use fabric I would not inflate the airbags to much over 40-45psi right now. I think the cordura will actually hold to much greater pressures than most peoples top of bottom molds will be able to stand. I think Montucky broke his top mold lengthwise at around 50psi. The cloth was fine.
I am still not convinced you need to press much higher than 40psi. Hell, vacuum bagging is only around 14psi (without any sort of crazy autoclave thingy I don't fully understand so I won't try and start an argument with anyone). I am just trying to make a point that many folks here on this site have made some great looking skis with a vacuum bag with almost 2.5 times less pressure.
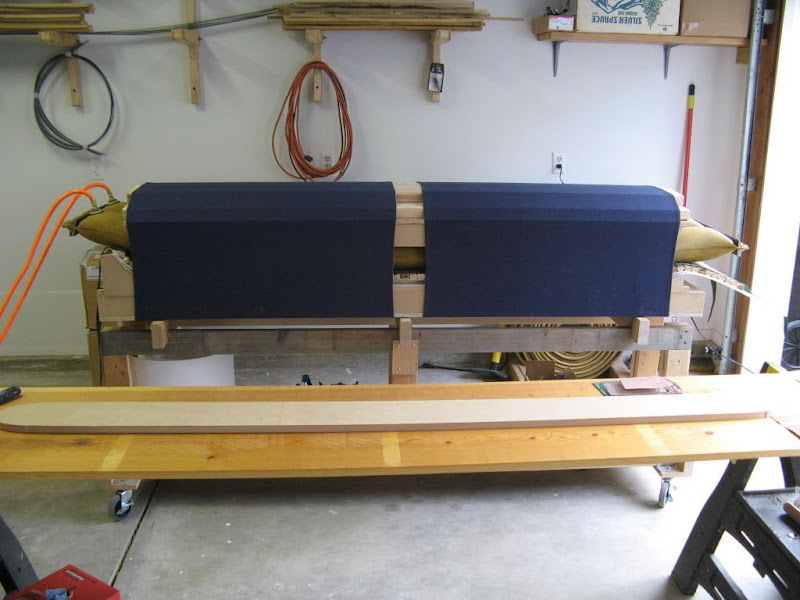
Some other pictures of cloth ski presses: Our old dual ski press before we chopped it in half like a snowboard into a pair of skis and before the duck cloth ripped:
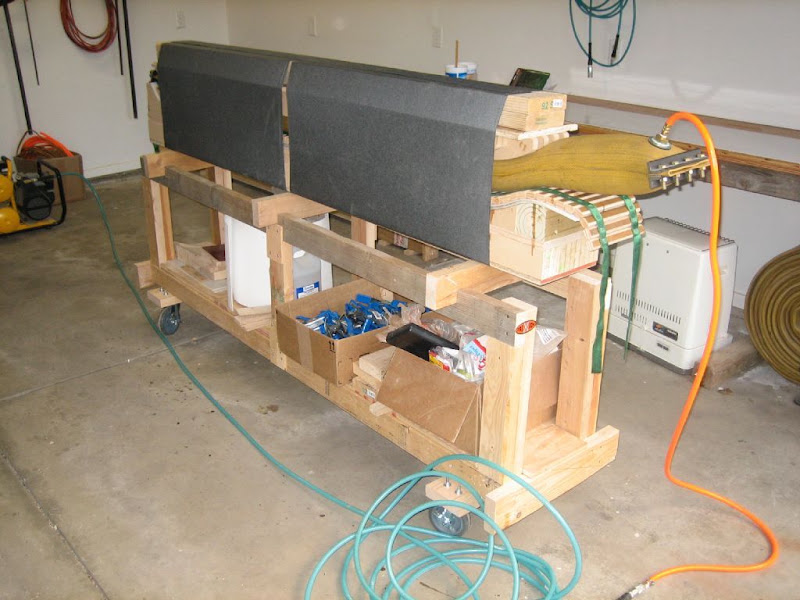
Our ski press now as a single ski press with the new and improved cordura fabric:
Plywood's press from attila:
One of Plywood's first cloth frames I believe:
image no longer available
Plywood, if you want me to remove those two photos just let me know.
chrismpSat Mar 21, 2009 4:31 am
that's pretty much what we're building at the moment.
just without the mdf strips to make a cambered mold...we just use a flat formwork boards (plywood) to get a flat base between the bindings (very similar to the capita horrorscope snowboards).
are the tip and tail blocks in this drawing adjustable along the channels in the base mold? if so how does he fasten them to the mold?
and how is he going to make the interlock rails between the top mold and the big blue block on top of it? (i guess some angled router bit, but that'd require quite some work)
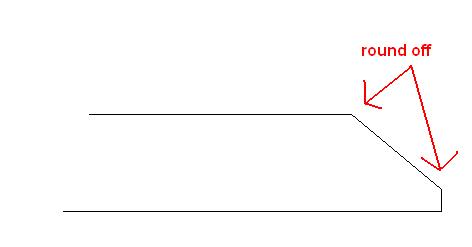
for the rounded edges of the blue reinforcement blocks i guess it would be sufficient if you just cut the edges off with a band saw and round off the two remaining edges. (see drawing)
chrismpMon Mar 23, 2009 3:07 pm
just a thought on lenghtwise deflection of the molds...maybe it's because your hoses are too big.
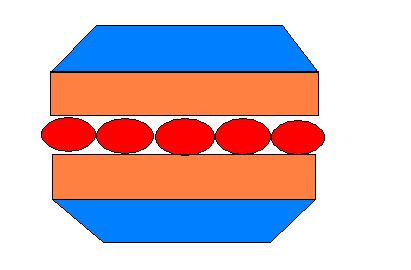
we're going to use five 3" diameter (4.3" flat, they're called firehose type B in europe) hoses that exceed the width of the mold by approx 1" on each side, which would support the outmost parts of the mold so they don't get pulled in as much.
and again a little drawing to show you what it's gonna look like (blue=reinforcement blocks, orange=molds, red=hoses):
shopvacMon Mar 23, 2009 7:59 pm
I think using 5 fire hose air bags is a great idea. I bet this will help with the lengthwise deflection quite a bit. I never thought about it because we had the larger yellow fire hose and that wasn't easy to track down in the first place. I like your idea and I think it wouldn't be bad to use two smaller hoses on a single ski press for that matter. It might help with balancing the top mold when you inflate also. We have to fiddle with our top mold and 2x6's to get everything to lay flat.
I also like your idea on rounding over the blue reinforcement blocks. I don't think you need to do a 45 degree chamfer though. I bet you could get away with a lot less and then just use a belt sander or something to make the edges round and non sharp.
Can't wait to see your press. I am curious to see if you can make it lighter than we made our dual ski press. It was really heavy. Not impossible to load, but it was a beast.
Are you going to use heat blankets?
Yes, I believe the tip and tail blocks are drawn to be adjustable. We just screw down a small 2cmx2cmx the width of the press in front and behind our tip and tail mold pieces. This keeps them in one place and it is fairly easy to move it.
I don't know how he will make the rails between the top mold and the big blue block above it, but honestly you don't really need to have them joined. You can just through the big blue block on top of it and slip your bags over it before you press. No problem.
chrismpTue Mar 24, 2009 2:14 am
yep, we're going to use heating blankets.
we came across a german company that produces carbon heating blankets that are usually used for underfloor heating, but they're able to go up to 140°C (=284°F). we're getting free samples that should be able to go up to 100°C at 230v (don't know the power consumption yet, since they're doing calculations on it atm, but it's supposed to be less than the silicone heating blankets).
great thing about them is that they heat up in about 40sec time!
pentagramTue Mar 24, 2009 3:46 pm
I look forward to hearing about this under floor heating blankets, you have a link to this German companys website?
SHIFTue Mar 24, 2009 4:42 pm
> chrismp wrote:yep, we're going to use heating blankets.
we came across a german company that produces carbon heating blankets that are usually used for underfloor heating, ...
Are they like these carbon under flooring heaters?
http://www.warmup.com/us-carbonheater.phtml
These show a low maximum temp of 82F
watt density only 12 w per sq ft.
Many similar products are on the market, Google it.
Tell us what German product has such high temps, sounds interesting.
-S
chrismpWed Mar 25, 2009 7:32 am
they'r pretty much the same i guess, but i think the company does more industry related stuff, so they offer to produce the foils to custom specs (given that you order large quantities).
we're supposed to get their standard foils mainly used for underfloor heating (approx. 60cm width), because that's what they have readily available (custom made foils would be way to expensive i was told).
i'll try to get the prices for the foils we'll be receiving and the minimum quantities to get them custom made (maybe we could do a mass order with all the guys from skibuilders and grafsnowboards).
unfortunately i don't know the name of the company or the product we're getting, but i'll let you guys know as soon as i find out (i'm in contact with them through a friend).
plywoodWed Mar 25, 2009 9:43 am
well well well, i don`t think multiple hoses instead of 1 hose make any difference. the pressure gets distributed over the whole lenght in any case. if you use 1 hose an fill it with 5 bar or so the pressure will be 5 bar over the whole area on which the hose is in contact with the molds. same with multiple hoses... so i can`t see the advantage of using multiple hoses as the difference in "contact area" of hose-mold is pretty marginal i guess.
what really makes a difference: the rounding of the edges. the more you round them the better it`s going to hold. therefore the best way would be to shape the mold somewhat circular, like a pipe. or for a 2-ski-press maybe something like a gothic arch or so if you know what i mean (not like a half circle, more like a half circle stretched in height)
this would absolutely take up all the forces inside the press and transfer them to the cloth frame.
and of course, the thicker the top and bottom mold the less trouble you`ll get. i took a pretty minimalistic approach as i wanted my press to be as simple and cheap as possible. therefore i didn`t dimension it for high pressure. but of course you could if you wanted to. then i`d definately take this gothic approach to prevent cracking molds.
chrismpWed Mar 25, 2009 2:19 pm
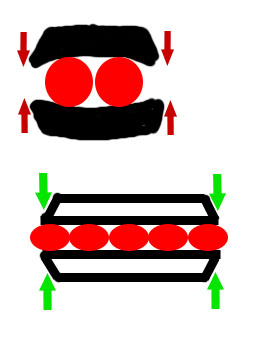
this might be true for your single ski presses. they just don't show that much deflection due to their narrow width. but in shopvacs video you can see that their double press (we're gonna build snowboards...bad, i know
) bends around the bladders quite a bit along the edges.
so i think using smaller bladders that exceed the press width should help prevent this, since they have a larger surface that contacts the mold (especially at the edges!).
MontuckyMadmanWed Mar 25, 2009 7:10 pm
arch = strongest shape known to man
Parabola
plywoodFri Mar 27, 2009 11:28 am
@chrismp: i understood what you ment. and i was saying exactely the same, it`s all about area. i don`t know what kind of hose you`re using...but there are quite huge hoses on the market that would go for a snowboard/double ski press. if you took such a hose you probabely would get an even better surface distribution than with multiple hoses.
and still: the mold doesn`t crack in the middle because the edges are not well supported. the mold cracks because the pressure in the middle is to high for it. i may error, but i`m pretty sure it won`t help much using multible hoses. you`re better off using an arched top&bottom mold
MontuckyMadmanSun Mar 29, 2009 10:05 am
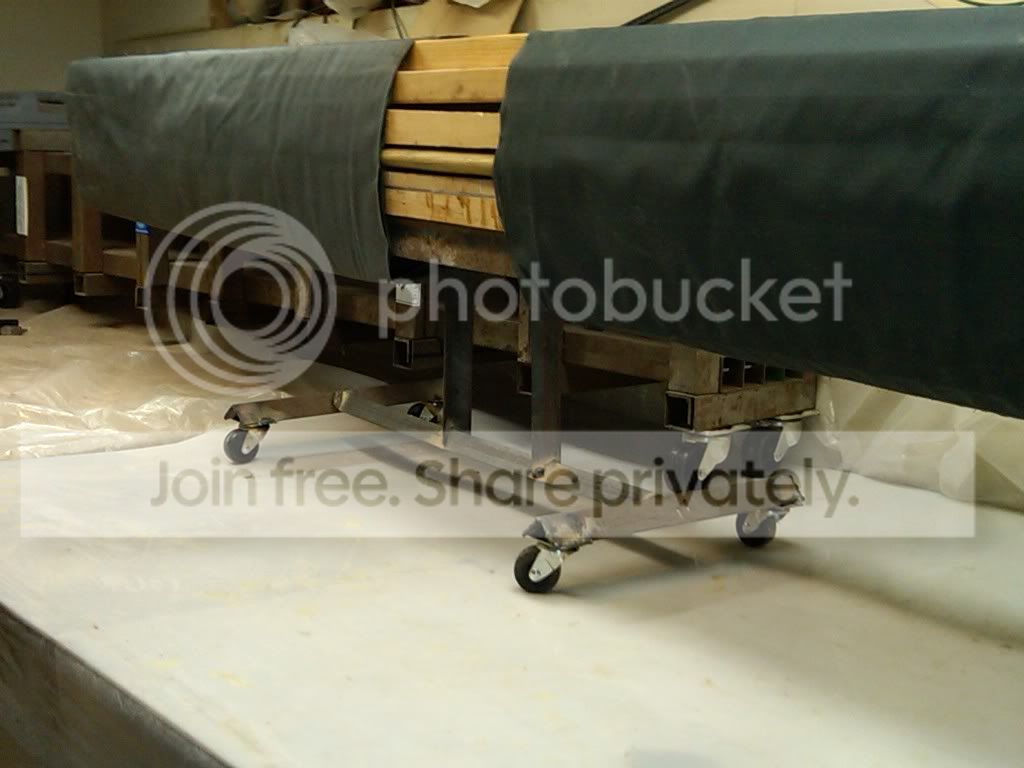
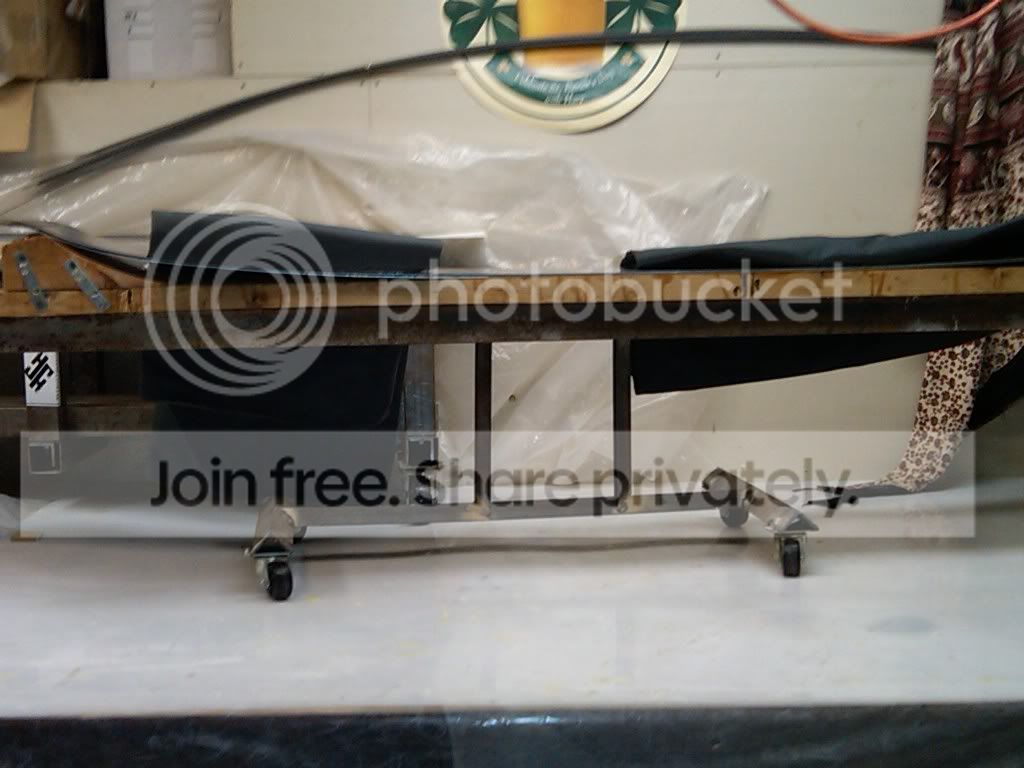
Heres the one I built for shits and giggles.
IU made a real ghetto elevation platform to easily slide the bags over.
I found a piece of heavy gauge channel stock that was about 6 inches wide for the bottom under the mold.
knightsofniiSun Mar 29, 2009 3:17 pm
is that another press frame behind it? What's the deal with that one?
MontuckyMadmanSun Mar 29, 2009 7:36 pm
yeah thats the one I use, single ski skibuilder thang. I'm just screwing around with this fabric deal because I am making these bags and I wanted an easy load alternative.
I got time...
chrismpTue Mar 31, 2009 10:50 am
@plywood: yeah, you're probably right...we'll do an arched top anyway just to be on the safe side. i just thought that, judging from shopvacs video, the reason for deflection in their molds are the huge hoses.
@montucky: thats a great idea for an easy loading cloth press! i'll see if i can come up with sth similar.
@all: i'm planning on using particle board to make the pyramid shape for the pressure distribution blocks on top of the molds. it's cheap and i think it could withstand the pressure. each board will be 2cm thick so the whole thing will be 10cm thick (approx. 4").
width
10cm ----
20cm --------
30cm ------------
40cm ----------------
50cm --------------------
thermikboardsSun May 03, 2009 8:41 am
hi,
i 'm a french shaper , and i want to know where you buy the "cordura" for to do the press ?
it is a very good idea !!
chrismpSun May 03, 2009 9:47 am
well, i'll be getting mine from montuckymadman here on this forum.
he made the great offer to send out the remnants he has for free.
other than that you could try this german online shop: http://www.extremtextil.de/catalog/prod ... cts_id=741
MontuckyMadmanSun May 03, 2009 11:24 am
15 bucks a meter?
I make mine with double thickness, so 2000 Denier.
Well, you will need a bit.
I can probably send you what you need, might cost $35 USD ?
Or I can perhaps make what you need, but if you have a good sewing
machine you can DIY.
webboyWed Oct 28, 2009 1:51 am
A few weeks ago I saw a duct tape cannon on Mythbusters. (Yes it worked.) This got me thinking: what about using duct tape to make the bags instead of cloth? The stuff is certainly strong enough if you use enough, but I guess that's the main question. I was thinking for most of us that the duct tape would be much easier to get and also no sewing. If you use bigger rolls and wrap around in a spiral, there wouldn't be too many "seams." Maybe start with a layer of plastic and some spacers underneath, and then just wrap away. Any thoughts from you engineer types? Just an idea of course. I realize that a lot of duct tape might be expensive.
MontuckyMadmanWed Oct 28, 2009 10:52 am
if you can't duck it f**k it!
plywoodWed Oct 28, 2009 11:39 am
well, you can tear duct tape apart from side to side... which means if don`t align it propperly the stress might get too much. furthermore it would be a pain to wrap ducttape around the whole mold....
webboyWed Oct 28, 2009 12:09 pm
@plywood: I agree with what you said, but my idea was to create reusable "bags," so I think it might be worth spending a few hours doing it properly. I also think alignment wouldn't be such an issue if you simply overbuild it a bit.
brandtWed Oct 28, 2009 12:42 pm
As you say, it sounds expensive. A roll of 50m Stockvik “silvertejp” (duct tape in Swedish) will cost you 100SEK/~$14 at Claes Olsson or Jula. Shopvac’s press was 40cm wide. Let’s assume that it was perfectly round, which it wasn’t. That would make the circumference of ~1,25 meter. A roll of duct tape will then give you 40 laps around the press and $35 worth (same as cordura bags from Montucky) of duct tape would give you 100 laps. I don’t know the physical properties of duct tape but I think your locking at a hell of a lot of duct tape to pull this off.
Where in Sweden are you?
webboyWed Oct 28, 2009 1:26 pm
Nice breakdown! I just threw out the idea without giving it that much thought. I still wonder if it's possible to do it cost efficiently. (Byggmax has it for 60 SEK / $8.50.) I didn't catch the whole episode, but on Mythbusters they even suspended a car for a while with a rather small amount of duct tape.
I live between Östersund and Åre- heard of Nälden? I am in Stockholm all the time for work as well...
brandtThu Oct 29, 2009 5:56 am
Can’t say I know Nälden but I remember seeing the name on signs on the E14 in the near of Krokom on the way to Åre.
